The Roster

Sunday, January 24, 2016

Tunnel Portal update completed

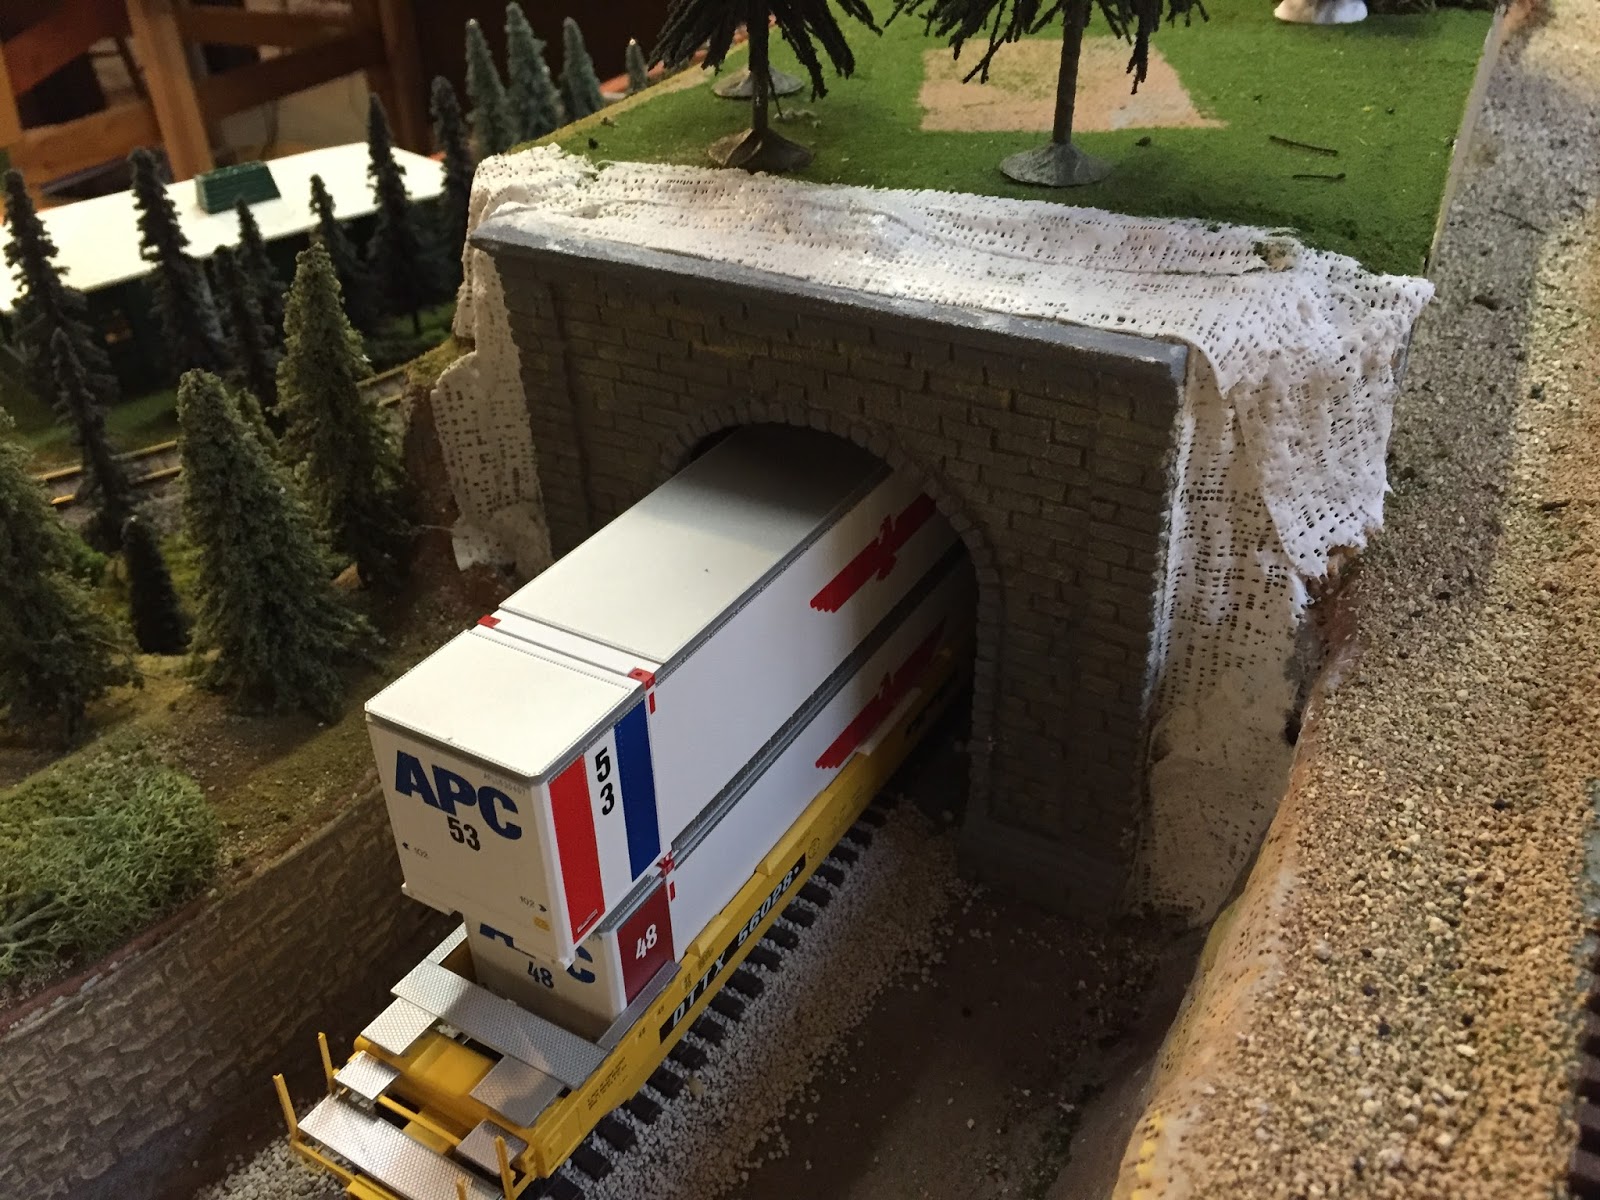
The portal update is completed!


A little bit of paint to cover the plaster and a little bit of flocking to cover the paint. Then it was a matter of gluing in some lichen for the shrubs and we're good to go!


Good view down the tunnel. You can see the exit on the other end. The 'rock wall' on the right needs a little work, but from a distance looks just fine.


Sunday, January 17, 2016

Tunnel Portal, take 2

Here's the back story, in 2015 I had finished the landscaping for the tunnel. It was done. Materials put away and I'd moved on to finished the yard. In the fall, I ran a double stack container train onto the track and routed it into the tunnel.

BAM!

I was not expecting that to say the least. The top container and clipped the top of the portal entrance and would not fit. It derailed five cars, spilled containers all over the track and caused a coupler pocket to explode.  I should have taken a picture - it was an accident worthy of an FRA report.  I was in shock - how could this happen. I knew I had run the train over this track before and never had a problem.

Yeah...before you installed the final tunnel portal. Idiot!

Yep, it's true I'd not tested the track after installing the last portal. It was a converted MTH portal and had been cut down to be closer to S gauge. When it was cut down, it was clearly cut down to an older clearance standard and not the modern standard.

This weekend I finally fixed the portal. Ripped out the old portal and installed a new one from Pre-size model specialties.  It was not hard work, just something I did not relish having to do.

The old portal, all nicely landscaped into the layout.

Overview showing the framework that comprises the tunnel.

Close up of the same space. I was able to leave most of the landscape in place.

The Plasticville church normally in the space beyond the trees was moved for this repair.

The new portal was much thinner than the old MTH version. This required inserting a styrofoam spacer to the portal,. It did not have to be pretty as it would not be visible once the potal was installed.

The spacer plugs in place.


Yes, I would forget which one belonged on which side.


The angle of the portal needed to be tweaked, so some spacers and cutting took place to support the desired placement.


The double stack car fits into the tunnel!

Checking the portal clearance for the double stasck cars.


Sliding into the installed tunnel portal. Still have to finish the painting and landscaping..

Here's a video showing the clearance test of the double stack car.


Tuesday, January 12, 2016

World's Greatest Hobby On Tour show in Indianapolis January 8-9, 2016

I'm back from a weekend in Indianapolis at the World's Greatest Hobby On Tour (WGHOT) train show.

Held in the South Pavilion of the Indiana State Fairgrounds, the show featured a vertibale who's who in the model train hobby. Exhibitors included Lionel (maker of American Flyer), MTH, Athearn, NASG, NMRA and Z-Stuff for Trains signals (owned by a fellow Miami University graduate!) to name just a few. There was a great cross section of model railroads on display in all gauges from "T" up to the mighty G. I might have missed it, by 7 1/2" gauge seemed to missing. Several railroad historical societies and hobby shops rounded up the mix.

Friday saw me driving up mid-day to join the crew setting up the layout. We had fantastic turnout for this with 15 people participating. This was really great as it made set up a much quicker and physically less demanding than I feared it would be.

Late Friday afternoon - set up is almost complete. The floor of the building is not level, but through generous use of shims, the layout worked well. For this show, the staging yard was truly a 'hump yard'. once past the mid-point, everything rolled to the back.

This is a big show. Each night and morning, you could find multiple instances of the television ad running for the show. It must have worked, or else the rain which lasted all day drove everyone to find an indoor activity. Saturday's crowds were huge, with the people packed in 'stroller to stroller'. I took a tour of the exhibit hall and after about 45 minutes I retreated to the relative sanity of the far corner of the layout display room.


Vintage dimestore dreams toy car


The Lionel S table - a simple oval plugging the Polar Express set.

The prototype F3 rolls on the MTH display layout. The only thing not available in that train was the F3 which has not yet been relelased.

Sunday started on a very different note. Late overnight the weather broke. The rain switched to snow. The wind picked up to 23 mph. On top of that temperatures plummeted through the twenties down into the teens throughout the day. I walked out of the hotel to find everything covered in a layer of ice and snow. Undaunted, I scraped off the ice and snow and headed to the show.

Unlike me, many people stayed home until at least noon. Sunday's show was lightly attended. We had a good crew turn out to aid in operating the layout. It gave a good opportunity to take some pictures.


The detail inside this one room of one building on the layout is amazing. I'd never noticed it before.
This figure is well lit from the overhead light.

American Models 4-8-4 Northern waits for the signal to pull out.


The train extends back into the station platform in the distance.


A few early departures were offset by a few diehards that braved the weather and drove over from Dayton. At the end of the day, we had the trailer loaded and were on the road by 6:00pm.

The drive home was slow, but otherwise uneventful. The weather was the most challenging element, but otherwise, we had a good time and really capitalized on this opportunity to showcase S Gauge trains to the general public.

Sunday, June 7, 2015

Fixing the MTH 2 Bay Hopper

...or Sunday afternoon at the repair bench.

So the MTH 2 -bay hopper I'd mail-ordered arrived in less than stellar condition. The weight was rattling internally. The weight may also have dismounted the end walls from both ends of the car. Plus the catwalk had come loose. Hell of a job on shipping boys!  Here's a few shots of what it looked like on arrival.

You can see the disconnected catwalk and the end walls

Another view of the end wall and the catwalk

The more I looked at it the more irritable I became.

 
Sadly as I did not open the box and recognize the issue within 10 days OR save the original shipping box, my return options with the merchant appear to be non-existent.  Fair enough - they have a clearly stated policy.  Guess I'm stuck with it. So...taking the bull by the horns, I set out to fix the damage.

First step - dis-assembly. Most other cars I own have the body held on with some snap-tight system. By spreading the body walls, I got the chassis to drop out and away from the body. Then the loose end caps fell off and out. This left me with five distinct parts.

Body, end walls, weight and chassis.
The only things that appear broken are the mounting pins on the top of each end wall. Even there, a little bit of the pins remain present. You can see where the initial glue has failed and allowed the parts to become loose. The weight was just rattling around loose inside the body.

The weight is a single, stamped metal part with four mounting holes in the corners.


Attaching the weight was just a question of centering the weight over the mounting holes and pressing down. There's enough resistance that the weight almost 'snaps' in place. If subjected to a lot of shaking it could come loose, but should stay put from normal usage.

The weight re-installed on the chassis. The bend in the metal weight allows it to conform to the chassis design. 


Next up was fitting the end walls back into place. They slid in easily, figuring out the exact positioning was a little mysterious, so I cheated and pulled out an old SHS 2-Bay hopper and checked how the parts fit on  that one. Give these are supposed to be made from the same molds, assembly should be similar.

I've fit the part to the chassis trying to figure out how the connecting rod, err...connects to the brake assembly. In the end the SHS PS-2 gave me the pattern to follow.


Included just to show how the L girder extends through the car wall.


You can see the old glue line and the pin slots in the ceiling of the car body.

 I dropped the end walls into the body and applied ABS cement. After it quick set I flipped the body over onto the chassis and installed it. The trickiest part was to align the brake machinery lever correctly, but even that was not too difficult. A quick visual inspect shows the end walls seated properly to the chassis.

Looking better!

The last step was getting the catwalk fixed. The pins had sheared off over about half the car. I placed small amounts of CA glue on the supports along the car roof and then pushed the catwalk down onto the glue. A rubber band held it in place, but I placed two bottles atop the catwalk for additional weight while the CA glue sets. 


All done save the test drive!

 This was a relatively short repair. Maybe 45 minutes total from starting disassemble to completion. I took my time - this included analysis of the problem and defining the solution. In the end, it was easier than I expected.

My only regret is that I should not have to basically do model kit level rough assembly for a brand new ready to roll item. I may buy additional items from MTH in the future, but I'll want to see it's condition before putting down the cash.

Monday, January 19, 2015

Putting up the trim boards

Big accomplishment of the weekend was getting the trim boards up on the exterior edge of the layout AND the hinged walk-thru bridge. It's starting to feel like a train layout! More importantly - the chance of a catastrophic derailing have been substantially reduced.


The bridge and ends of the layout with the trim boards up.


Time to restock the Pizza Hut..or Taco Bell...or KFC.


Adding this board makes the river appear much more complete.


Need to touch up the stain on the left end of the board. It broke off during sawing.


Sunday, January 4, 2015

Getting 2015 off on the right foot!

The first week of 2015 has seen signifigant progress being made on the model railroad. Lots of landscaping work is being done along with trim boards on the exterior of the layout.


An aerial shot of the southeast corner of the layout.  Inner loop on the left.


Oblique view of the same scene above.


The apartments have recieved additional trees and the parking lot as a few more cars.

Added the stained trim boards to this corner of the layout.


The trim boards really class up the layout. Adding the road and flocking the corner helped as well!

The bridge was flocked as well, adding to the finished look of the layout.


Added the pine trees along the river bank. The diner is a temporary set up to help gauge in determining what fits in the space and what else can fit (like maybe a post office or gas station). Clearly, more trees are required.

Same trees - different perspective.